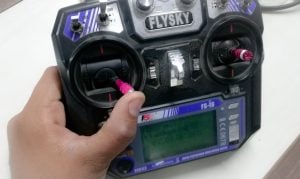
Step by step tutorial on how to connect motors to the ESC & how to calibrate them.
Firstly we will be Connecting motors to ESC's and will then Calibrate - Connecting Motors to ESC -
Calibrating ESC's - Electronic speed controllers are responsible for spinning the motors at the speed requested by the autopilot. Most ESCs need to be calibrated so that they know the minimum and maximum pwm values that the flight controller will send. This page provides instructions for calibrating ESCs
Method 2 - All at once ESC calibration -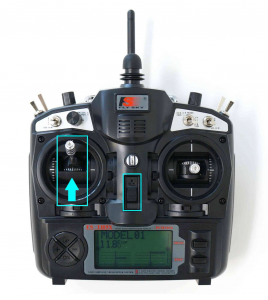


Arming the Copter -
TESTING-
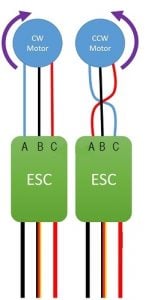
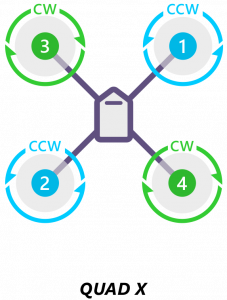
- As we know, in quadcopter, 2 motors rotate in CW direction and 2 motors rotate in CCW direction.
- Refer the image below to connect ESC to Motor.

- Arrange the Motors in the given way.

Calibrating ESC's - Electronic speed controllers are responsible for spinning the motors at the speed requested by the autopilot. Most ESCs need to be calibrated so that they know the minimum and maximum pwm values that the flight controller will send. This page provides instructions for calibrating ESCs
About ESC Calibration
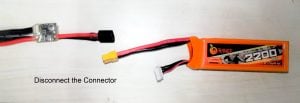
ESC calibration will vary based on what brand of ESC you are using, so always refer to the documentation for the brand of ESC you are using for specific information (such as tones). “All at once” calibration works well for most ESCs, so it is a good idea to attempt it first and if that fails try the “Manual ESC-by-ESC” method.** Warning ** Before calibrating ESCs, please ensure that your copter has NO PROPS on it and that the APM is NOT CONNECTED to your computer via USB and the Lipo battery is disconnected
Method 1 - Manual ESC-by-ESC Calibration -- Plug one of your ESC three-wire cables into the throttle channel of the RC receiver. (This is usually channel 3.)
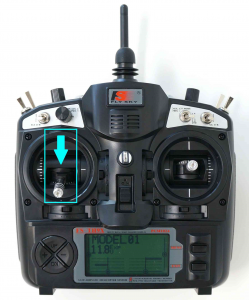
- Turn on the transmitter and set throttle stick to maximum (full up).
- Connect the LiPo battery
- You will hear a musical tone than one or two beeps.
- After the two beeps, lower the throttle stick to full down.
- You will then hear a number of beeps (one for each battery cell you’re using) and finally, a single long beep indicating the end points have been set and the ESC is calibrated.
- Disconnect battery. Repeat these steps for all ESCs.
- After calibration, recheck that motors should work in coordination with throttle stick i.e as soon as the throttle stick is moved from its minimum position, motor should start rotating.
- Make sure that all ESC's are calibrated and are working properly.
Method 2 - All at once ESC calibration -
- Turn on your transmitter and put the throttle stick at maximum.

- Connect the Lipo battery. The autopilot's red, blue and yellow LEDs will light up in a cyclical pattern. This means the it's ready to go into ESC calibration mode the next time you plug it in.

- With the transmitter, throttle stick still high, disconnect and reconnect the battery.


- For PX4 or Pixhawk, press and hold the safety button until it displays solid red.
- The autopilot is now in ESC calibration mode. (On an APM you may notice the red and blue LEDs blinking alternatively on and off like a police car).
- Wait for your ESCs to emit the musical tone, the regular number of beeps indicating your battery's cell count (i.e. 3 for 3S, 4 for 4S) and then an additional two beeps to indicate that the maximum throttle has been captured.
- Pull the transmitter's throttle stick down to its minimum position.

- The ESCs should then emit a long tone indicating that the minimum throttle has been captured and the calibration is complete.
- If the long tone indicating successful calibration was heard, the ESCs are "live" now and if you raise the throttle a bit they should spin. Test that the motors spin by raising the throttle a bit and then lowering it again.
- Set the throttle to minimum and disconnect the battery to exit ESC-calibration mode.
Arming the Copter -
- Make sure that the Transmitter and receiver are connected.
- For Arming, hold the throttle to Extreme minimum and Yaw to Extreme left. That is the left joystick should be held for 4-5 seconds in extreme bottom right corner.
- Now hold in this position for 4-5 seconds to Arm.
- Blue and Red LED will blink in APM confirming the Arming.
- If After arming, setup is left idle for 12-15 seconds, it again gets Disarmed.
TESTING-
- Ensure your transmitter's flight mode switch is set to “Stabilize Mode”.
- Arm your Drone.
- Give a small amount of throttle. All motors should spin at about the same speed and they should start at the same time. If the motors do not all start at the same time and spin at the same speed, the ESC’s are still not properly calibrated.
- Disarm your drone.

